
Why does that expensive cedar finish you applied last spring look like a peeling, grey mess by the following April? Most homeowners believe a fresh coat of stain is just a simple cosmetic weekend project, but avoiding common deck staining mistakes in the BC Interior requires a deep understanding of chemistry and timing. You aren't alone if you've felt the frustration of watching your hard work fade or faced the daunting task of stripping an uneven finish. It's exhausting to invest your time only to worry about wood rot and the high cost of fixing a failed application.
We're here to help you master this process by sharing the professional secrets to a long-lasting, beautiful finish. This 2026 guide provides the technical expertise you need to revitalize your outdoor environment with confidence. You'll learn about the critical 10°C to 30°C temperature window, the importance of the 48-hour curing period, and how to choose between trending carbon gray or classic nutmeg tones. We also explain the vital preparation steps that ensure your stain penetrates deeply, providing years of peace of mind and protecting your home's value.
Key Takeaways
- Learn how to identify and remove mill glaze, the invisible barrier on new lumber that prevents even the highest quality stains from adhering properly.
- Discover the critical differences between oil-based and water-based formulas to ensure your product choice stands up to the intense sun and dry air of the BC Interior.
- Master the "wet edge" technique for a seamless finish while avoiding common deck staining mistakes like over-application, which often results in a sticky, peeling surface.
- Understand why using a moisture meter is a non-negotiable step to verify the wood is ready to absorb and lock in a professional-grade coating.
- Explore how specialized equipment and industrial-strength coatings can revitalize your outdoor space with a level of durability that standard retail products cannot match.
The Foundation: Why Preparation Mistakes Ruin Your Deck
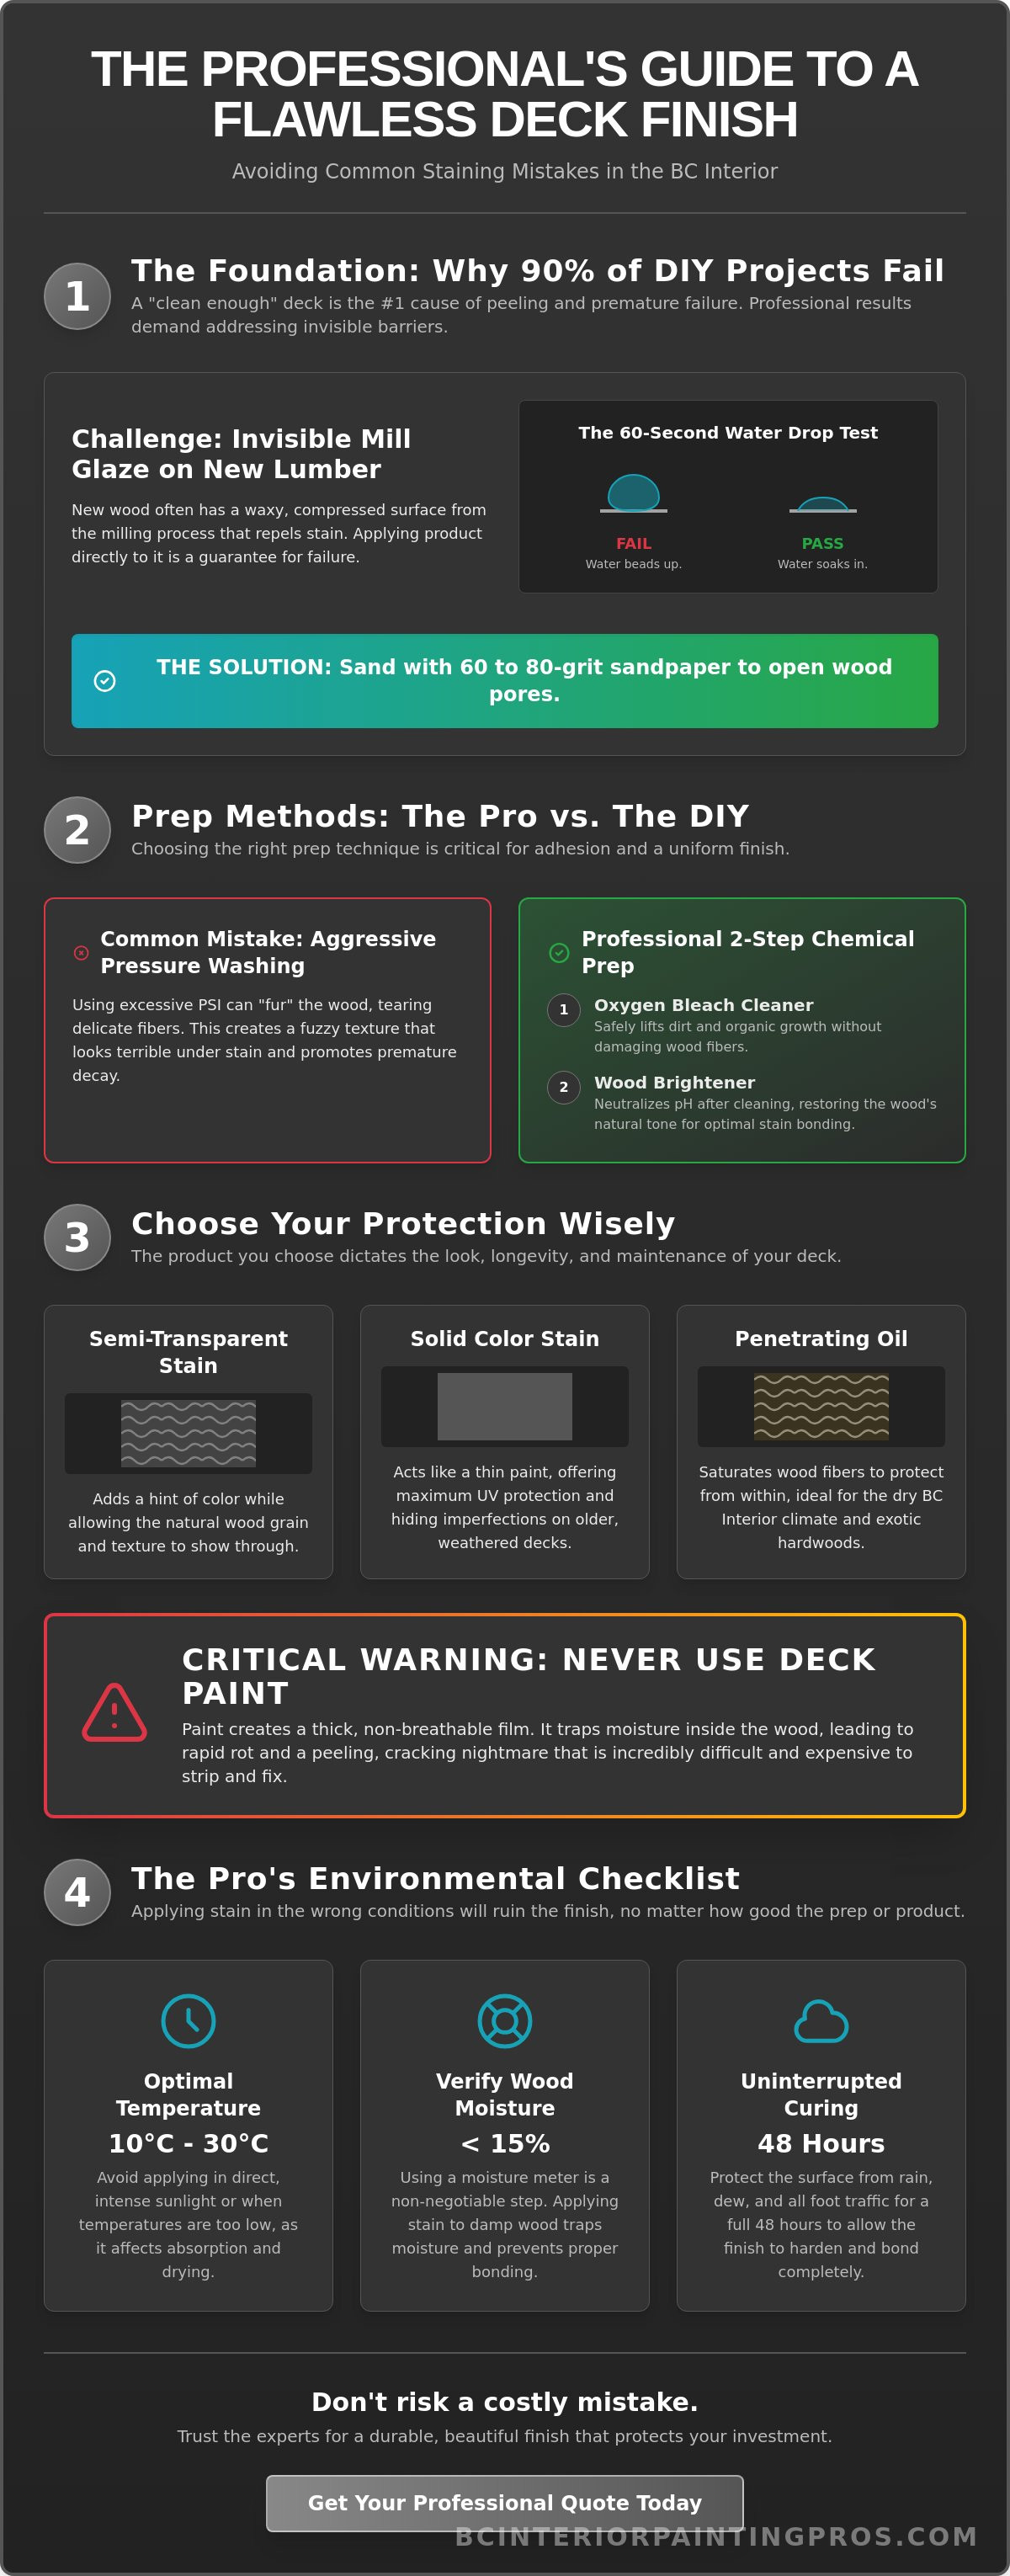
A deck that looks clean to the naked eye is often still chemically or structurally unfit for a new coating. This "clean enough" fallacy is a primary reason why many DIY projects fail within twelve months. When avoiding common deck staining mistakes, you must look beyond surface dirt and address the invisible barriers that prevent adhesion. Professional results start with opening the wood's pores, ensuring the material can actually absorb the product rather than letting it sit on top to peel. Without this deep level of attentiveness, your investment in high-end materials is essentially wasted.
Identifying and Removing Mill Glaze
New lumber presents a unique challenge known as mill glaze. During the manufacturing process, high-speed planers create friction and heat that draws natural oils and resins to the surface, creating a crushed, waxy layer. If you apply stain directly to this, it will simply slide off. You can test for this using the "Water Drop Test." Sprinkle a few drops of water on the boards; if it beads up rather than soaking in within 60 seconds, your wood isn't ready. To fix this, we use a mechanical approach. Sanding with 60 to 80-grit sandpaper is the sweet spot. It's aggressive enough to tear through the glaze and open the fibres, but not so fine that it polishes the wood shut again.
Chemical Prepping vs. Mechanical Prepping
Choosing between chemical and mechanical prep depends on the wood's condition and the goals of the project. While pressure washing is common, excessive PSI can "fur" the wood, tearing the delicate fibres and creating a fuzzy texture that looks terrible under a fresh stain. Oxygen bleach cleaners are often a safer, more effective choice for lifting organic growth without damaging the wood structure. However, these cleaners are often caustic. After cleaning, the wood's pH level is usually too high for optimal bonding. This is where wood brighteners act as the secret sauce. These citric or oxalic acid-based solutions neutralize the surface, restoring the natural pH and brightening the wood's appearance. Gaining a deeper understanding wood stain types and how they interact with the wood's chemistry is essential for a professional-grade result. Without this balance, even the most expensive oil-based product will struggle to bond.
Sanding remains a non-negotiable step for both old and new decks in the Kamloops climate. For older wood, it removes dead, greyed-out cells that have been damaged by intense UV rays. For newer wood, it ensures a uniform profile for the stain to grip. This commitment to thoroughness is what separates a frustrating weekend failure from a transformation that lasts for years. We view this phase not as manual labour, but as the technical preparation of a canvas. It's about ensuring that every square inch of the wood is ready to accept the protection it needs to survive the BC Interior seasons.
Choosing the Wrong Product for BC Wood Species
Selecting the right product is just as vital as the preparation steps mentioned earlier. If you have an older deck with many imperfections, a solid stain provides better coverage. However, for a beautiful Western Red Cedar deck, a semi-transparent stain highlights the natural grain. One of the most significant parts of avoiding common deck staining mistakes is resisting the urge to use "deck paint." Unlike stain, paint creates a thick, non-breathable film. It traps moisture inside the wood, leading to rapid rot and a peeling nightmare that is incredibly difficult to strip later. Consider these options for your surface:
- Solid Stains: These act like a thin paint, hiding wood grain while offering maximum UV protection for weathered boards.
- Semi-Transparent Stains: These contain pigments that tint the wood while still allowing the natural texture to show through.
- Penetrating Oils: These soak into the wood fibres to protect from within, making them ideal for the dry Kamloops air.
The Kamloops climate presents a unique environmental challenge. Oil-based stains are excellent for older, parched wood because they penetrate deep into the cells. Water-based formulas have improved significantly by 2026, offering better UV resistance and easier cleanup. But don't mix them. Applying a water-based product over an old oil finish without proper stripping will result in a failed bond. If you're unsure which product was used previously, our team of local painting experts can perform a simple solvent test to identify the existing coating.
Staining BC Cedar vs. Pressure-Treated Lumber
Western Red Cedar is a BC staple but contains water-soluble tannins. These can migrate to the surface and cause dark, ugly spots if you don't use a tannin-blocking primer or a high-quality oil stain. Many homeowners also fall for the "seasoning" myth with pressure-treated lumber, believing they must wait a full year. In reality, modern kiln-dried boards might be ready in weeks. Use a moisture meter to verify the wood is below 15% moisture before application.
Film-Forming vs. Penetrating Stains
The technical difference lies in how the product interacts with wood fibres. Penetrating oils soak into the wood, replenishing natural resins and protecting from the inside out. Film-forming products, like many acrylic-based stains, sit on the surface. In the extreme heat of a Kamloops summer, these films can become brittle and crack. For those seeking long-term value, professional guidance on deck finishes suggests that penetrating stains are often easier to maintain. Mastering the chemistry of your coating is a vital part of avoiding common deck staining mistakes that lead to premature fading.
Environmental Hazards: Timing and Weather Errors in Kamloops
Timing your project in the BC Interior is a delicate balancing act. While you might be eager to finish on a sunny Saturday, the Kamloops heat often works against you. A major part of avoiding common deck staining mistakes involves respecting the local climate rather than fighting it. When the surface temperature of your deck exceeds 30°C, you risk a "flash drying" disaster. The stain's solvents evaporate before the pigments can penetrate the wood fibres, leaving behind ugly lap marks and a finish that will peel within months. This isn't just a cosmetic issue; it's a structural failure of the coating's chemistry.
Wind and dust are equally disruptive environmental factors that many homeowners overlook. In Kamloops, spring winds often carry fine silt or even wildfire smoke particles that settle into wet stain, ruining an otherwise smooth finish. We recommend following the 48-hour rule: ensure the wood has been dry for two full days before you start, and that no rain is forecasted for at least 48 hours after you finish. This window allows the resins to cure properly and bond with the cellular structure of the wood without being interrupted by moisture or debris.
The Kamloops Sun: Your Deck's Biggest Enemy
The intense UV radiation in our region doesn't just feel hot; it actively destroys the wood's lignin, which is the natural glue holding the fibres together. If you leave a freshly sanded deck exposed to the sun for more than a few days without protection, the surface cells begin to degrade. To combat this, we utilize a "shade chasing" technique. This involves planning the workflow to stay in the shadows as the sun moves across the property. By maintaining a surface temperature between 10°C and 25°C, you ensure the product cures at the correct rate, resulting in a deep, uniform glow that lasts for years.
Managing Wood Moisture Content
Visual inspections are notoriously unreliable. A deck might look parched on a 30°C afternoon, but if it rained the night before, the internal moisture levels could still be far too high for success. This is why we insist on using a professional moisture meter rather than guessing. For maximum stain penetration, the wood must reach a moisture content between 12% and 15%. If you apply product to wood that is too damp, the moisture becomes trapped under the new coating. As the sun beats down, that water turns to vapour, creating internal pressure that causes the stain to blister and lift from the surface. Avoiding common deck staining mistakes like this requires patience and technical accuracy, ensuring the wood is truly ready to be revitalized.
Application Technique: Avoiding the 'DIY Look'
Even with perfect weather and the right product, the physical application of the stain determines whether your deck looks like a professional masterpiece or a blotchy weekend project. High-end results require more than just "painting" the wood. A critical component of avoiding common deck staining mistakes is understanding that wood is a porous, living material. It can only absorb a specific amount of liquid. If you apply too much, the excess resins sit on the surface, creating a sticky, shiny film that will inevitably peel. In the world of premium wood care, more is definitely less.
The "Wet Edge" rule is your best defense against ugly lap marks. This technique requires you to stain the entire length of a board without stopping. If the stain dries mid-board and you overlap it later, you create a darker, double-stained patch that is impossible to hide. If you're dealing with a previous application mistake where the finish is already uneven, you may need to strip the surface entirely. You can't simply layer new stain over a blotchy foundation and expect it to look uniform. Our professional deck staining services specialize in correcting these errors to ensure a seamless, artisan-quality finish.
The Art of Back-Brushing
Back-brushing is the single most important movement in the staining process. Whether you use a roller, a pad, or a sprayer to get the product onto the deck, you must follow up with a brush to force the stain into the wood grain. This mechanical action breaks the surface tension and ensures a permanent bond within the wood cells. For oil-based products, a natural China bristle brush is the standard. For water-based formulas, a high-quality synthetic brush is required to prevent the bristles from swelling. Using a roller on vertical railings often leads to drips and heavy pooling, which is why we always prioritize hand-brushing for spindles and posts.
Dealing with End-Grains and Spindles
End-grains act like a bundle of straws, absorbing up to three times more product than the face of the board. This saturation is necessary for protection, but it requires careful management to prevent dark, oversaturated spots. To achieve a professional flow, always follow a strict order of operations: railings and spindles first, floorboards last. This prevents you from dripping wet product onto a finished floor. If you spot a run or a drip, brush it out immediately. In the dry Kamloops air, these errors cure quickly, leaving permanent scars on your finish. Attentiveness during this phase is what creates the transformation our clients expect.
The Professional Advantage: When to Call BC Interior Painting Pros
While the technical steps outlined in this guide provide a roadmap for success, executing them perfectly requires a significant investment in both time and specialized equipment. Many homeowners find that the most reliable method for avoiding common deck staining mistakes is partnering with a team that possesses industrial-grade resources. We utilize high-CFM dust-extraction sanders and professional-grade pressure washers that provide consistent results without damaging delicate wood fibres. These tools allow us to achieve a level of surface preparation that is simply not possible with standard consumer-grade orbital sanders or retail equipment.
Our team also provides access to premium commercial coatings that aren't typically available in big-box stores. These advanced formulations offer superior UV protection and deeper penetration, which are essential for the harsh climate of the BC Interior. We specialize in those "nightmare" stripping jobs that many DIYers dread. If your deck has layers of old, failing solid stain or uneven patches from previous attempts, we have the chemical and mechanical expertise to clear the canvas and start fresh. This professional intervention ensures your deck doesn't just look better; it lasts longer. Companies like Cardwell Property Services Inc. demonstrate how this same commitment to professional property maintenance and construction results in superior outdoor spaces.
Precision and Attentiveness in Every Stroke
Our commitment to quality extends beyond the wood itself. We prioritize the protection of your surrounding environment, ensuring that your siding, windows, and landscaping remain untouched by cleaners or stain. With over 20 years of experience in the Kamloops region, we have developed a deep understanding of local weather patterns. We know exactly how to judge the humidity and heat windows to ensure your project cures under optimal conditions. For a broader look at how we protect and revitalize your home's facade, you can explore our Exterior Painting Kamloops guide.
Revitalizing Your Outdoor Living Space
A professional stain job does more than protect wood; it revitalizes your entire outdoor environment. The intersection of high-end materials and expert execution creates a finish that significantly boosts property value and curb appeal. This focus on excellence is shared by Cascade Outdoor Services, whose expertise in deck restoration and structural outdoor construction sets a benchmark for quality results. By choosing a professional service, you secure a long-term result backed by a commitment to reliability and cost transparency. We view every deck as a unique artisan project that deserves a tailored approach rather than a quick fix. If you are ready to reclaim your weekends and ensure a flawless finish, Get a Free Painting Estimate in Kamloops Today. Let us help you achieve the peace of mind that comes with a job done right the first time.
Revitalize Your Outdoor Living Space Today
Mastering the art of avoiding common deck staining mistakes is the difference between a project that peels and one that thrives. You now understand that a beautiful finish requires technical preparation, the right chemical balance, and a deep respect for the Kamloops sun. Whether it's removing mill glaze or perfecting the back-brushing technique, every detail matters in protecting your wood for the long term. A well-maintained deck isn't just a weekend goal; it's a structural investment in your home's future.
With over 20 years of local experience, we've become Kamloops' choice for high-end exterior maintenance. Our team provides comprehensive care, including expert stucco and wood repair, to ensure your home's transformation is complete and durable. Don't let another season of intense UV rays damage your investment. Book Your Professional Deck Staining Consultation in Kamloops Today! We're ready to bring accuracy and attentiveness to your next project, giving you the peace of mind you deserve. Your dream outdoor space is just one professional application away.
Frequently Asked Questions
Can I stain my deck if it rained yesterday?
No, you shouldn't apply stain to a deck that is still damp from recent rain. Wood is highly porous and requires at least 24 to 48 hours of dry weather to ensure the internal moisture content has dropped below 15%. If you apply a coating to wet wood, you trap moisture inside, which eventually turns to vapour under the sun and causes the finish to blister and peel.
How many coats of stain should I actually apply?
Most high-quality penetrating stains require only one or two coats, depending on the specific product instructions. A major part of avoiding common deck staining mistakes is resisting the urge to over-apply. If the wood fibres are already saturated, any additional product will sit on the surface, creating a sticky film that fails to cure and attracts dirt.
Why is my brand-new deck stain already peeling?
Peeling on a new deck is almost always caused by mill glaze or high moisture content. Mill glaze is a waxy layer created during the wood's manufacturing process that prevents stain from soaking in. If you don't sand the boards to open the pores before application, the stain stays on the surface and quickly loses its bond with the wood.
Do I really need to sand my deck before staining it?
Yes, sanding is a non-negotiable step for achieving a professional-grade finish. It removes dead, greyed-out wood cells on older decks and breaks through the mill glaze on new lumber. Using 60 to 80-grit sandpaper creates an ideal surface profile that allows the stain to penetrate deeply and bond permanently with the cellular structure of the wood.
What is the best temperature for staining a deck in Kamloops?
The ideal temperature range for application is between 10°C and 30°C. In the Kamloops climate, late spring and early fall provide the most reliable windows. You should avoid staining in direct mid-day sun or during extreme heat waves, as the product will "flash dry" on the surface before it has a chance to soak into the wood grain.
Can I put solid stain over a semi-transparent stain?
Yes, you can apply a solid stain over an old semi-transparent finish once the surface is properly cleaned and prepped. Solid stains are more opaque and act similarly to a thin paint, making them an excellent choice for masking the uneven wear or colour variations of a previous semi-transparent coating. However, you cannot go back to semi-transparent once a solid stain is applied without a full strip.
How long should I wait for a new pressure-treated deck to dry?
You should wait until the wood's moisture content is below 15%, which can take anywhere from a few weeks to several months. While many homeowners follow the old "wait a year" rule, modern kiln-dried pressure-treated lumber often dries much faster. We recommend using a moisture meter to verify the wood is ready rather than relying on a calendar date.
Is it better to use a brush, roller, or sprayer for staining?
A combination of tools is often the most efficient approach, but a brush is required for the final finish. While sprayers and rollers can apply the product quickly, you must follow up with "back-brushing." This manual movement forces the stain into the wood pores and ensures a uniform, artisan-quality appearance that rollers alone cannot achieve. This technique is vital for avoiding common deck staining mistakes like lap marks and uneven saturation.


