What if the key to a kitchen that looks brand new for the next five years isn't a massive renovation, but the specific way you wipe down your doors today? It's a common fear for many homeowners in Kamloops. You've invested in a beautiful transformation, yet every fingerprint on a dark cabinet or splash of cooking grease near the stove feels like a permanent threat. Understanding how to maintain painted kitchen cabinets shouldn't feel like a high-stakes chemistry experiment where one wrong spray could strip the finish.
We agree that your home deserves a level of care that matches the quality of the initial paint job. That's why we're sharing the professional secrets to preserving a factory-smooth finish that stands up to daily life and our unique local climate. You'll learn a simple, non-toxic cleaning routine that removes stubborn buildup without dulling the paint's sheen. We also provide clarity on exactly when a quick DIY fix works and when it's time to bring in an expert to revitalize your space. This guide ensures your kitchen remains a source of pride and peace of mind for years to come.
Key Takeaways
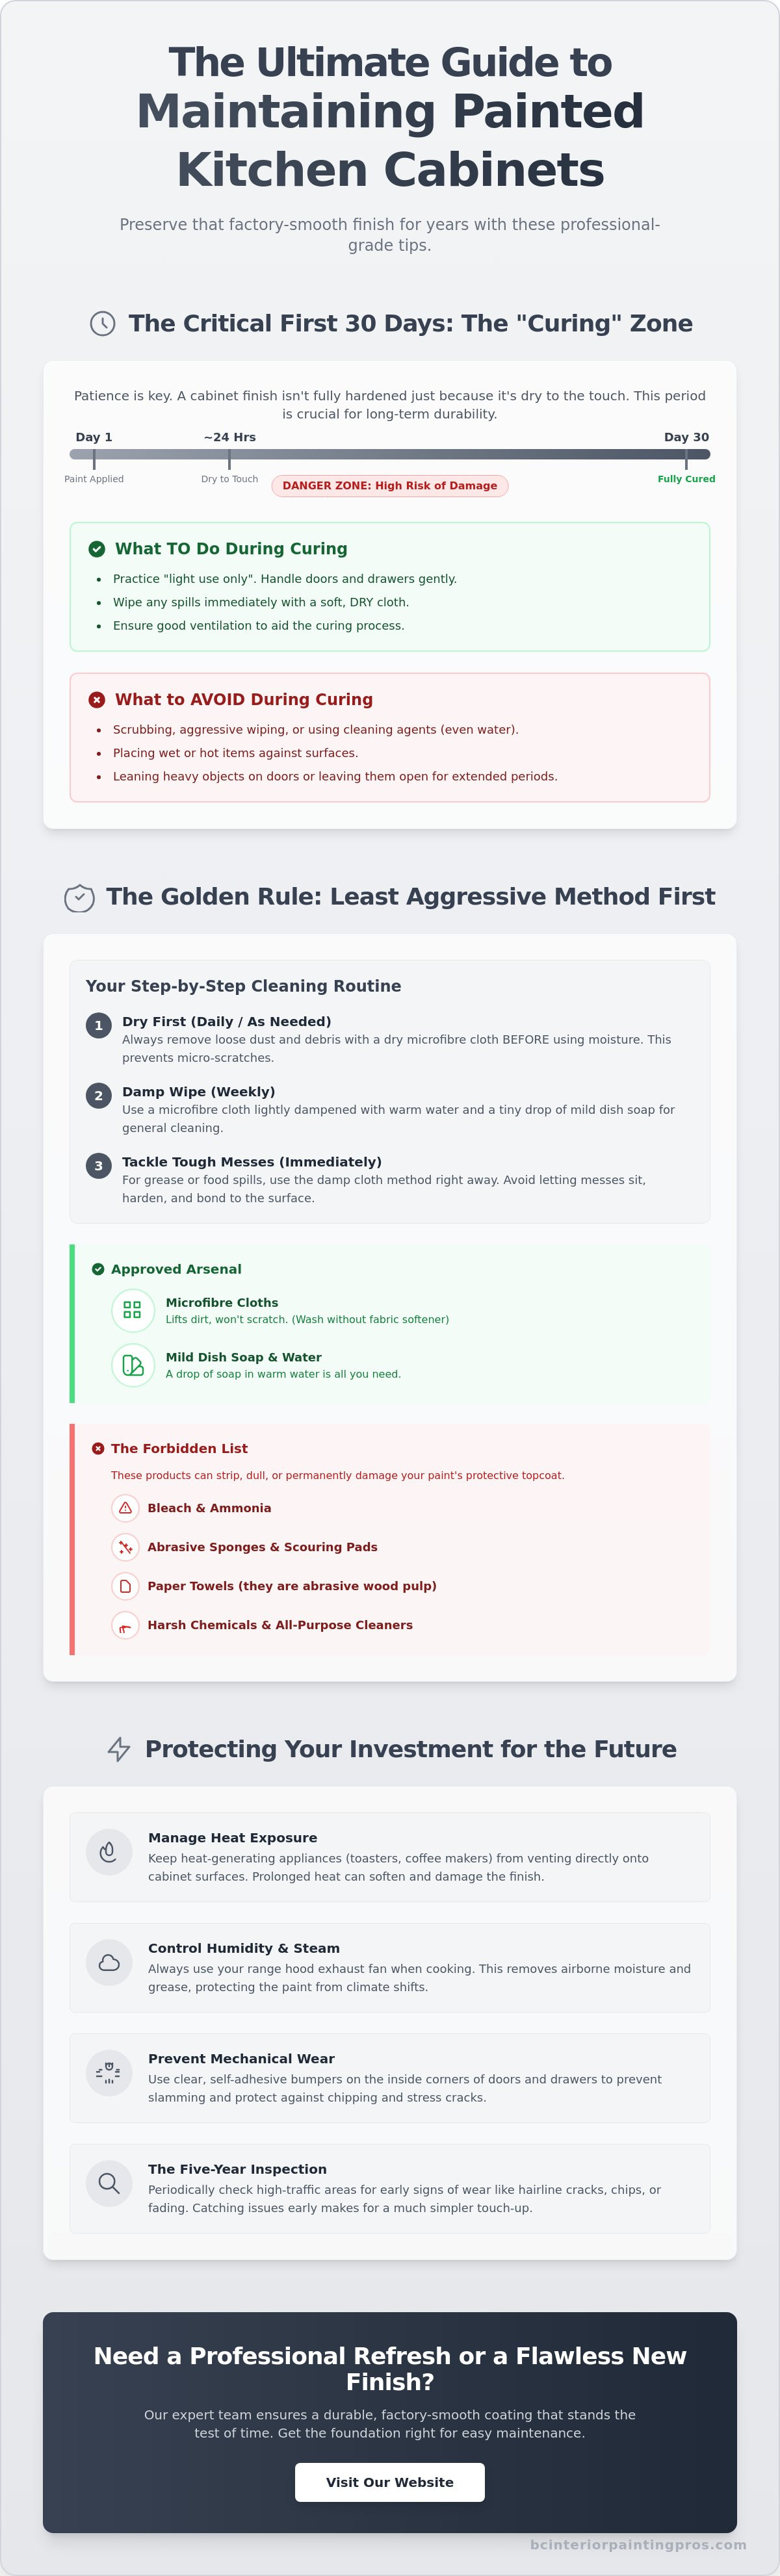
- Understand the critical difference between dry time and cure time to ensure your high-end finish hardens into a durable, protective shell.
- Discover how to maintain painted kitchen cabinets using the "Golden Rule" of cleaning, which prioritizes the least aggressive methods to preserve the paint's factory-smooth sheen.
- Protect your surfaces by avoiding the "Forbidden List" of cleaners, such as ammonia and bleach, which can permanently compromise the integrity of your topcoat.
- Manage environmental factors specific to the Kamloops climate, including humidity shifts and heat from small appliances that can cause finishes to melt or warp.
- Learn to spot early signs of wear during a five-year inspection to keep your kitchen looking freshly painted for the long term.
The Science of Preservation: Understanding Your Painted Finish
A professional cabinet finish is far more than a simple layer of color. It's a complex chemical shield designed to withstand the heat, moisture, and friction of a busy kitchen environment. By understanding the properties of paint, you can better appreciate why the first month after a project is so critical for the longevity of your home. This initial period determines the long-term resilience of your surfaces and how well they resist the daily wear and tear of a modern household.
Dry vs. Cure: Why Patience Saves Your Paint
Most homeowners assume that once a cabinet door is dry to the touch, it's ready for heavy use. This is a dangerous misconception that can lead to permanent damage. Paint "dries" when the surface solvents evaporate, but it "cures" only after the internal chemical structure fully hardens and bonds. For high-end coatings, this process takes approximately 30 days to complete. During this "danger zone," the finish remains soft and susceptible to impressions, scuffs, or chemical reactions. Learning how to maintain painted kitchen cabinets starts with extreme patience during these first four weeks.
We recommend a "light use only" policy during this window. You should avoid scrubbing the doors or using any cleaning agents, even natural ones. If you're unsure if the finish is ready for a more thorough cleaning, try the fingernail test in an inconspicuous area like the back of a lower drawer. Press your nail gently into the paint. If it leaves a mark or feels slightly tacky, the coating hasn't reached its maximum hardness yet and requires more time to stabilize.
The Anatomy of a Professional Cabinet Coating
Standard latex wall paint is far too soft for the mechanical stress of a kitchen. Professional-grade finishes, such as Benjamin Moore ADVANCE, utilize waterborne alkyd technology to provide superior protection. These products offer the leveling and extreme hardness of traditional oil-based paints while remaining low-VOC and environmentally friendly. The secret to their durability lies in the cross-linking of molecules as they cure. This process creates a glass-smooth surface that actively resists household oils, steam, and fingerprints.
For homeowners starting with a fresh installation, selecting high-quality custom foundations from specialized providers like Instacabinets ensures that the professional finish has a stable, premium surface to bond with.
At BC Interior Painting Pros, we focus on the critical bond between the primer and the substrate. A beautiful topcoat is only as strong as the foundation beneath it. By using specialized bonding primers and precision application techniques, we ensure the paint doesn't just sit on the surface; it becomes an integrated part of the cabinet. This technical attentiveness is why our clients see their kitchens look freshly painted years after the initial transformation. Understanding these chemical realities helps you treat your cabinets with the care they need to remain a centerpiece of your home.
Your Daily and Weekly Cleaning Routine
Maintaining a professional finish requires a gentle touch and a disciplined approach. Our "Golden Rule" for cabinetry is simple: always start with the least aggressive cleaning method possible. This philosophy prevents unnecessary wear on the protective topcoat while ensuring the surface remains pristine. If you're wondering how to maintain painted kitchen cabinets effectively, consistency beats intensity every time. A quick daily wipe after meal prep prevents grease from bonding to the surface. For your weekly routine, a more thorough dusting followed by a damp wipe keeps the factory-smooth finish looking its best for years.
Before introducing any moisture, adopt a "Dry First" approach. Use a clean, dry cloth to remove loose dust and pet hair. Skipping this step often results in moving grit around the surface, which can cause micro-abrasions over time. Once the surface is clear of loose debris, you can proceed with a more targeted cleaning. If you're planning a full kitchen transformation, our team of local painting experts can help you achieve a durable, high-end finish that makes this routine even easier to manage.
The Microfibre Advantage
Microfibre is the only fabric that should touch your painted surfaces. Unlike traditional cotton rags, microfibre features millions of tiny hooks that lift and trap particles rather than dragging them across the paint. Paper towels might seem convenient, but they're surprisingly abrasive. Because they're made from wood pulp, they can cause tiny scratches that dull the paint's sheen over time. When washing your microfibre cloths, avoid using fabric softeners. These chemicals leave a waxy residue on the fabric that can transfer to your doors, creating unsightly streaks or a hazy appearance that is difficult to remove.
The 'Damp, Not Wet' Technique
Water is a useful tool, but it's also a potential risk. Standing water is the primary enemy of cabinet door seams, where it can seep into the substrate and cause the wood to swell or the paint to lift. We recommend a two-cloth system for your weekly deep clean. Dampen one microfibre cloth with warm water and a single drop of mild dish soap, then follow immediately with a dedicated dry cloth. To achieve a professional, streak-free result, use a continuous "S-pattern" motion. Start at the top corner and move horizontally, looping back down in a smooth curve. This technique ensures you actually remove contaminants rather than just redistributing them. For more detailed best practices, review these Dos and Don'ts of Cabinet Cleaning to avoid common household pitfalls.
Tackling Tough Messes: Grease, Grime, and Spills
Even the most disciplined cleaning routine faces the reality of a high-traffic kitchen. Spills happen. The most persistent threat, however, is "cooking atomization." This is a fine mist of grease that travels through the air during meal prep and settles on your doors. Over time, these oils bond with the surface, creating a sticky residue that attracts dust and fingerprints. Mastering how to maintain painted kitchen cabinets involves dismantling these oils without compromising the chemical integrity of the coating. Always perform a spot-test on the inside of a door before applying any new solution to ensure it doesn't etch or dull the finish.
Safe Degreasing Solutions
Professional painters rely on the "Blue Dawn" method for a reason. A single drop of mild dish soap in a bowl of warm water creates a powerful, pH-neutral degreaser that is safe for high-end coatings. It breaks down organic oils effectively without the use of harsh solvents. While some online forums suggest using white vinegar, you should use it with caution. If you choose vinegar for mineral deposits, ensure it's diluted to a 1:10 ratio with water. For the best results, look for commercial cleaners specifically labeled as pH-neutral. These products are engineered to lift grime while leaving the protective topcoat completely intact, preserving that factory-smooth feel.
The 'Forbidden' Cabinet Cleaning Tools
Many common household tools are surprisingly destructive to a painted finish. Magic Erasers are perhaps the most dangerous. While they seem like soft sponges, they're actually made of melamine foam, which acts like 3,000-grit sandpaper. Using one will effectively sand away your cabinet's sheen, leaving a permanent dull spot that can't be wiped away. Similarly, you must avoid steel wool, abrasive sponges, and baking soda. While baking soda is a popular "natural" cleaner, its crystalline structure is too abrasive for smooth paint. It creates micro-scratches that trap future grime, making the cabinets significantly harder to clean as they age.
Avoid wood polishes and waxes at all costs. These products often contain silicones that create a slick, non-stick layer on the surface. While they might provide a temporary shine, they ruin the ability to perform professional touch-ups in the future. New paint cannot bond to a waxed surface, often requiring a full, costly strip-and-sand process to fix a simple chip. Stick to simple, non-toxic methods for how to maintain painted kitchen cabinets to ensure your kitchen remains a revitalized, beautiful environment for years.
Environmental and Mechanical Protection
While cleaning removes surface contaminants, environmental and mechanical factors determine if your cabinets survive the next decade. In Kamloops, our seasonal shifts create a unique set of challenges for wood and the coatings that protect them. Learning how to maintain painted kitchen cabinets requires an awareness of these invisible forces. From the dry air of a BC winter to the mechanical stress of a sagging hinge, your kitchen is constantly in motion. Addressing these factors early prevents the structural issues that often lead to premature paint failure.
Protecting your investment also means being mindful of the heat sources in your kitchen. High temperatures can soften even the most durable coatings, making them vulnerable to peeling or melting. If you're concerned about the current state of your kitchen's finish, our team provides expert residential painting services designed to withstand these daily stresses. By combining high-end materials with professional execution, we create a space that remains beautiful despite the environmental demands of the Thompson-Okanagan region.
Managing Humidity and Temperature in Kamloops
Wood is a hygroscopic material, meaning it absorbs and releases moisture from the air. In Kamloops, the transition from a dry winter to a more humid spring causes cabinets to expand and contract. This movement puts immense pressure on the paint at the "stiles and rails," which are the vertical and horizontal joints of your door. To minimize this stress, we recommend keeping your indoor humidity at a consistent level year-round. This stability prevents the wood from moving excessively, which protects the paint film from cracking at the seams.
Heat management is equally vital. We advocate for the "Heat Shield" rule: never operate small appliances like toasters, kettles, or air fryers directly underneath your upper cabinets. The concentrated steam and heat can eventually "cook" the paint, leading to discoloration or delamination. Perhaps most importantly, never use your oven's "Self-Clean" cycle without first removing the cabinet doors and drawers immediately adjacent to it. The extreme temperatures generated during this cycle can easily melt the finish on nearby cabinetry.
Hardware and Friction Management
Mechanical wear is the leading cause of paint chips, yet it's often overlooked. Over time, hinges can loosen, causing the door to sag and strike the frame. This repeated impact will eventually chip even the hardest industrial coating. Perform a "Rub Point" audit every six months by slowly closing each door and checking for any resistance or contact with the frame. Most modern soft-close hinges are easily adjustable with a screwdriver, allowing you to realign the door and eliminate friction before damage occurs.
Another simple, $5 fix involves your cabinet bumpers. These small protectors prevent the door from slamming against the frame, but they often flatten or fall off over time. Replace old, hard plastic or felt bumpers with soft silicone protectors. These provide superior shock absorption and ensure a soft landing every time a door closes. For more tips on preserving your home's interior, visit our painting blog where we share professional insights on long-term maintenance and care.
Long-Term Maintenance and Professional Refreshes
A high-quality paint job is an investment that matures over time. While your daily and weekly routines prevent immediate damage, a comprehensive five-year inspection is vital for the long-term health of your cabinetry. During this check, look closely at the edges of doors near the dishwasher and stove, as these areas face the highest concentration of steam and heat. You should also examine the "rub points" mentioned earlier to ensure no new mechanical wear has developed. Understanding how to maintain painted kitchen cabinets means recognizing the difference between a minor scuff and a structural finish failure that requires professional intervention.
Working with a reputable Kamloops painting contractor provides a level of security that DIY projects often lack. A professional warranty ensures that your kitchen remains a revitalized environment, giving you peace of mind that the materials and application techniques will stand the test of time. As your cabinets age, these periodic professional assessments help you decide whether a simple touch-up will suffice or if it's time for a topcoat refresh to restore that original factory-smooth luster.
Mastering the DIY Touch-Up
Small nicks and scratches are inevitable in a busy home. To handle these effectively, you must keep a small, airtight "touch-up" jar of the original paint batch used during your project. Paint colors can vary slightly between batches, so using the exact same mixture is the only way to ensure a perfect match. When you find a small chip, avoid the urge to use a standard paintbrush, which can leave visible texture. Instead, use a small foam dabber or a fine-tipped artist's brush to "dab" the paint into the void. This technique fills the gap without creating a raised edge.
If a scratch has a jagged border, use 400-grit or finer sandpaper to gently feather the edges before applying paint. This creates a smooth transition that prevents the repair from being visible once it dries. Remember that even the best DIY repair is a localized fix. If you find yourself performing frequent touch-ups across multiple doors, it may be a sign that the original coating has reached the end of its lifespan or was compromised by environmental factors.
Revitalizing Your Kitchen with BC Interior Painting Pros
There comes a point where a professional refresh is the most cost-effective way to protect your cabinetry. We specialize in revitalizing kitchens through advanced application methods that traditional brush-and-roller techniques cannot match. Our team utilizes high-volume, low-pressure (HVLP) spray systems—a technique also perfected by professional respray companies like SKR Specialists—to deliver an ultra-fine mist, resulting in a glass-like finish that is as durable as it is beautiful. We also employ dust-free sanding technology to ensure your home remains clean and breathable throughout the entire process.
Our commitment to accuracy and attentiveness ensures that every project meets our high-tier standards for quality. We don't just apply a new layer of paint; we revitalize your entire space by addressing underlying substrate issues and using the most advanced materials available in 2026. Ready for a transformation? Get a free estimate for cabinet painting in Kamloops and discover how we can help you maintain a stunning kitchen for years to come.
Protecting Your Kitchen Investment for Years to Come
Preserving a beautiful, factory-smooth finish is a journey of consistent and gentle care. By respecting the critical 30-day curing window and adopting a microfibre-only cleaning routine, you ensure your cabinets remain resilient against the demands of a busy household. Mastering how to maintain painted kitchen cabinets also requires an awareness of the Kamloops climate and the mechanical stress of daily use. These proactive habits prevent minor wear from becoming a costly repaint, keeping your environment looking fresh and revitalized for the long term.
When you're ready for a professional transformation, rely on a team that values long-term results over quick fixes. We are locally owned and operated in Kamloops, BC, with over 20 years of local experience delivering specialized HVLP spray finishes. Our approach combines high-end materials with the accuracy and attentiveness your home deserves. Book Your Free Cabinet Painting Estimate in Kamloops today to start your journey toward a stunning, durable kitchen. Your home is a reflection of your standards, and we're here to help you maintain that beauty for many years to come.
Frequently Asked Questions
Can I use a Magic Eraser on my painted cabinets if the stain is really tough?
You should never use a Magic Eraser on your painted cabinetry. While it feels soft, melamine foam is a micro-abrasive that acts like extremely fine sandpaper. Using it will permanently dull the sheen of your paint, leaving a noticeable flat spot that cannot be wiped away. Instead, stick to a damp microfibre cloth and a mild, pH-neutral cleaner to protect the integrity of your factory-smooth finish.
How long do I have to wait to clean my cabinets after they’ve been professionally painted?
You must wait at least 30 days before performing a thorough cleaning on newly painted cabinets. While the surface may feel dry to the touch within hours, the chemical hardening process known as curing takes approximately four weeks. During this window, the paint remains soft and vulnerable to damage. Limit your interactions to very light use and avoid all cleaning agents to ensure the coating reaches its maximum specified hardness.
Is vinegar safe to use on painted kitchen cabinets?
Vinegar is only safe if you dilute it heavily, typically at a ratio of one part vinegar to ten parts water. Because vinegar is acidic, using it at full strength can etch the paint and cause the finish to lose its luster over time. For most household messes, mild dish soap is a much safer alternative. If you use a diluted vinegar solution, always follow up with a dry microfibre cloth to remove moisture immediately.
What is the best way to remove grease from cabinets above the stove?
The most effective way to remove cooking grease is by using warm water mixed with a single drop of mild dish soap. This pH-neutral solution breaks down organic oils without the use of harsh solvents that could damage the topcoat. Apply the solution with a microfibre cloth using a continuous S-pattern motion. This technique is a core part of how to maintain painted kitchen cabinets because it lifts the grease rather than spreading it.
Why is the paint on my cabinet joints cracking?
Cracking at the joints is usually caused by the natural expansion and contraction of wood during Kamloops' seasonal humidity shifts. The joints where the stiles and rails meet are under constant mechanical stress as the wood moves. To minimize this, maintain a consistent indoor humidity level. While minor hairline cracks are often a cosmetic reality of solid wood cabinetry, keeping your environment stable will significantly reduce their visibility and frequency.
How often should I professionally deep clean my painted cabinets?
You don't need a professional deep clean often if you maintain a disciplined weekly routine. We recommend a thorough personal inspection every six months to check for grease buildup or hinge misalignment. Most high-quality professional finishes will look pristine for five to eight years before needing a technical topcoat refresh. Consistent weekly maintenance is the most reliable way to extend the time between professional service visits and ensure long-term durability.
Can I use furniture polish or wax to make my painted cabinets shine?
You should avoid all furniture polishes and waxes on your painted surfaces. These products often contain silicones that create a slick layer, making it impossible for new paint to bond to the surface during future touch-ups. Waxes also tend to attract dust and create a hazy, uneven appearance over time. If you want to restore the shine, a simple cleaning with a pH-neutral solution and a dry microfibre buff is the safest and most effective method.


