Your choice of an expensive topcoat paint doesn't guarantee a professional finish if you skip the foundation. In fact, applying premium paint directly to new drywall often leads to uneven absorption and visible seams, which is a common frustration for Kamloops homeowners who expect perfection. We've seen local renovation projects where skipping a dedicated pva primer resulted in the drywall absorbing 30% more finish paint than necessary, leading to "flashing" and blotchy patches that ruin the room's aesthetic.
We understand that you want your home to reflect a high standard of quality without unnecessary waste. This guide explains how using the right sealer acts as a secret weapon to elevate your space and protect your investment. You'll discover how this essential first step creates a uniform surface, hides imperfections, and ensures every stroke of paint contributes to a flawless, long-lasting transformation. We'll break down the technical benefits of sealing porous surfaces and why our team considers this step non-negotiable for a truly meticulous result; for further inspiration on achieving a premium finish, you can visit Harbour and Hayes to see their work on international luxury projects.
Key Takeaways
- Understand why sealing porous new drywall is the essential first step to preventing uneven paint sheens and "flashing" on your Kamloops walls.
- Discover how using a specialized pva primer provides a budget-friendly, professional-grade bond that ensures your topcoat adheres flawlessly.
- Learn the key differences between thin-seal and high-build primers to make the most cost-effective choice for your specific project needs.
- Identify the professional tools and meticulous preparation techniques required to achieve a smooth, high-end finish that elevates your interior space.
- Gain insight into how a local team with over 20 years of experience applies precision and care to deliver long-lasting, premium results.
What is PVA Primer? The Essential Foundation for Kamloops Walls
Achieving a high-end finish in a Kamloops home begins long before the first gallon of colour is opened. If you're looking at bare drywall, you're looking at a thirsty, porous surface that will soak up expensive paint like a sponge. This is where What is PVA Primer? comes into play. PVA stands for Polyvinyl Acetate, a synthetic resin that serves as a specialized sealer designed specifically for new drywall and fresh joint compound. It's the secret to ensuring your walls don't just look painted, but professionally finished.
Many homeowners confuse sealing with priming for colour. While a standard primer helps with colour transition, pva primer acts as a chemical bridge. It penetrates the paper and mud, creating a uniform surface. Without it, the "flashing" effect occurs. This is when some areas look dull and others look glossy because the wall absorbed the paint unevenly. We use this product to ensure every stroke of the topcoat adheres with precision and care. It acts as a literal glue, binding the paint to the wall for a long-term bond that won't peel or flake.
The Chemistry of PVA Primer Explained
The resin in this product is intentionally thinner than standard acrylic primers. This low viscosity allows the liquid to sink deep into the gypsum core and the dusty surface of the joint compound. Once it dries, it creates a hard, non-porous film that binds loose particles together. PVA primer is a latex-based sealer specifically formulated to even out the porosity of new, unfinished drywall surfaces. By sealing these pores, it prevents the topcoat from drying too quickly, which allows the paint to level out for a flawless result. This technical step is how we elevate a standard room into a premium living space.
When to Use PVA Primer in Your Home
You'll need this specialized sealer for any project involving bare walls. If you're finishing a basement development in Sahali or building a custom home in Juniper Ridge, pva primer is non-negotiable. It's the only acceptable choice for fresh mud and tape work. Our team specializes in these high-stakes transformations where professional results depend on this initial bond. Bare drywall and fresh joint compound are the primary candidates for this treatment. Using a standard wall paint directly on these surfaces is a mistake that leads to an inconsistent finish. We prioritize transparency and quality, ensuring your new build or renovation receives the correct chemical foundation from the start.
Why PVA Primer is Non-Negotiable for New Drywall and Mud
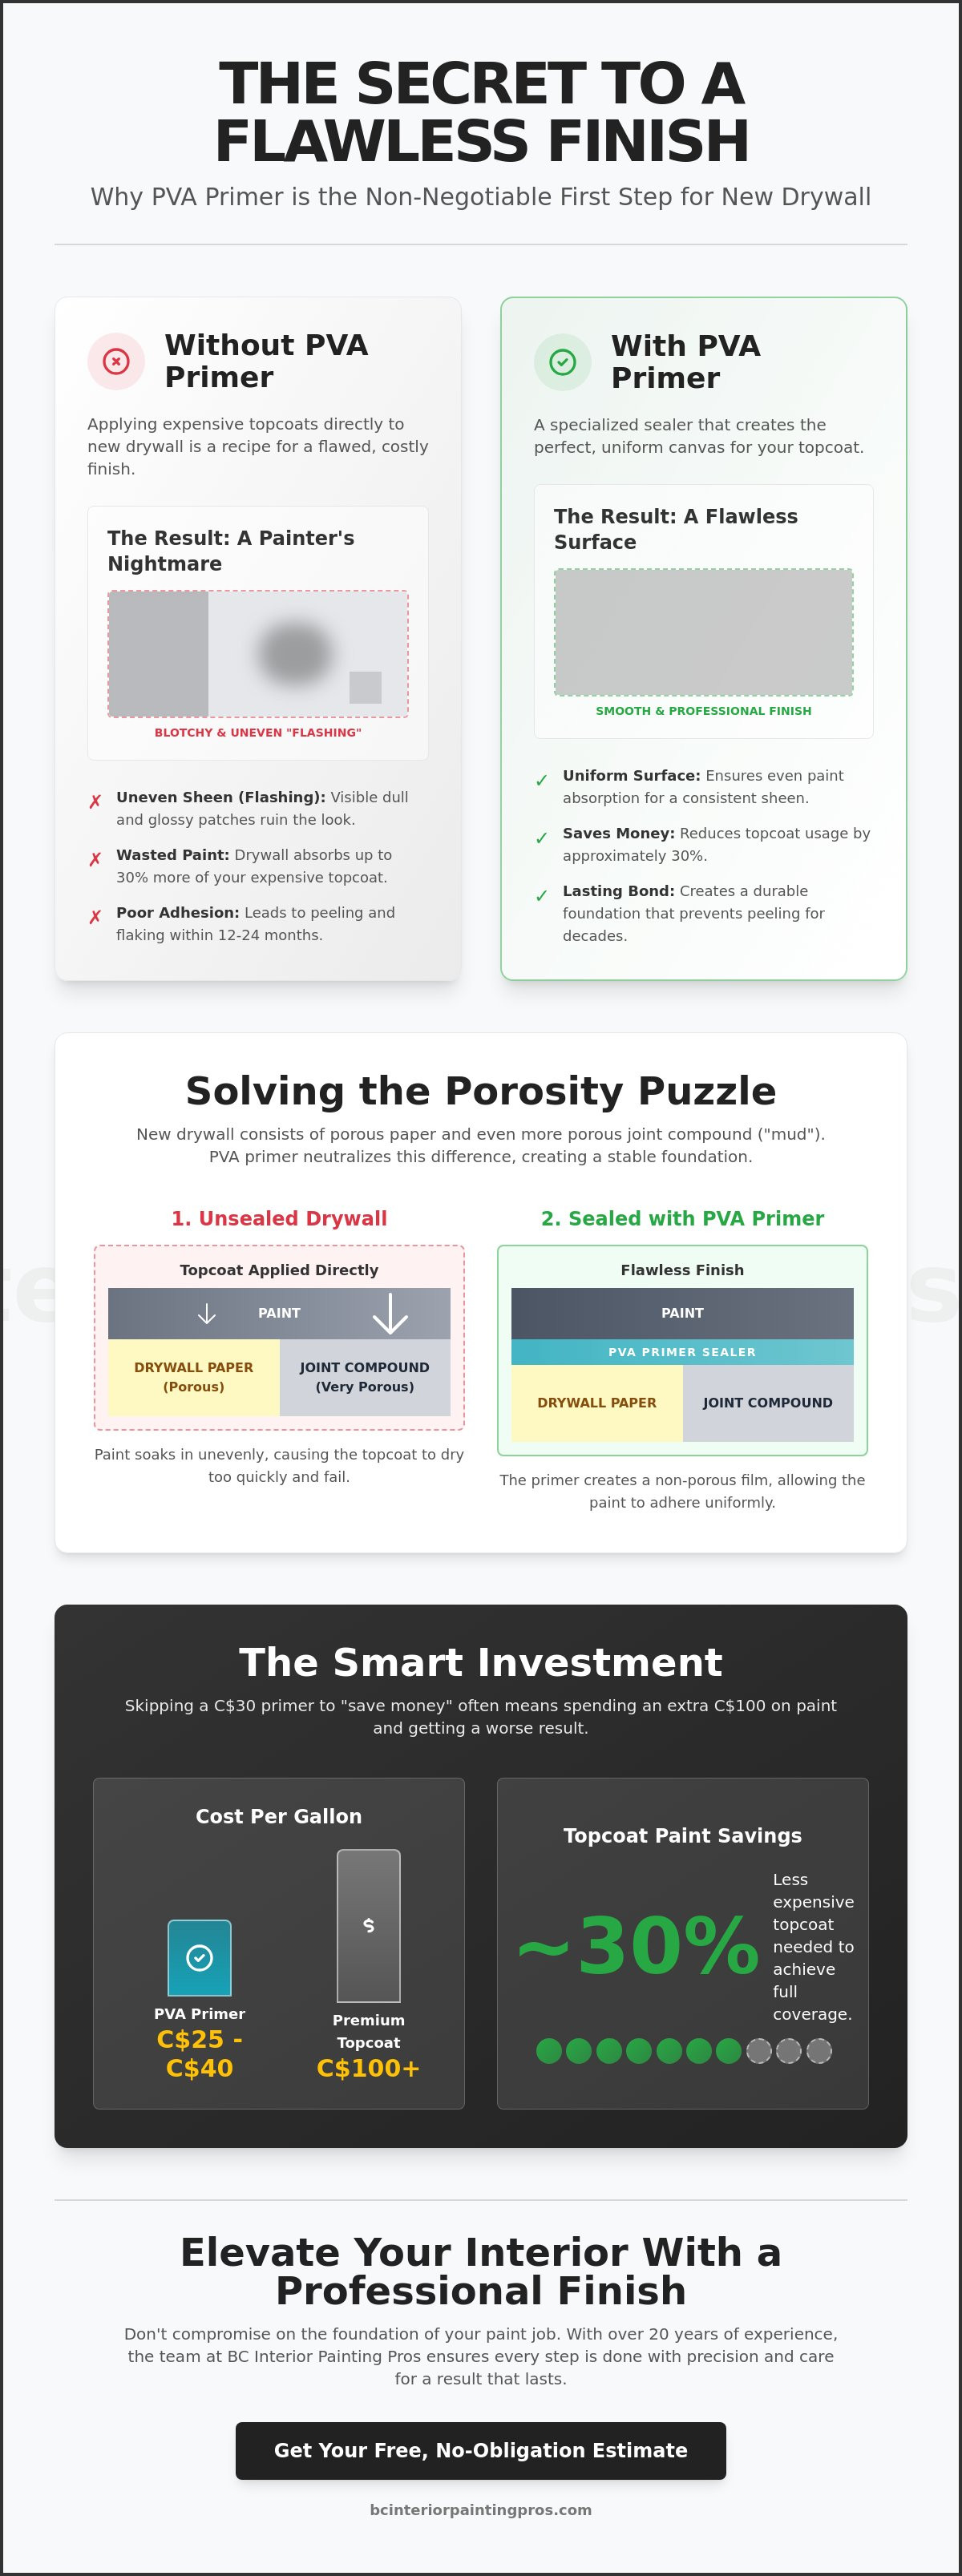
New drywall is essentially a giant sponge composed of two distinct materials: gypsum-based joint compound and paper facing. These surfaces have vastly different absorption rates. Without a high-quality pva primer, your expensive topcoat will soak into the mud faster than the paper, leading to a phenomenon called flashing. This creates visible, dull patches where the paint sheen looks uneven, even after three coats. We utilize PVA (Polyvinyl Acetate) because it acts as a specialized sealer, equalizing the surface so your finish looks uniform from corner to corner.
From a financial perspective, skipping this step is a costly mistake. A standard gallon of professional-grade PVA primer costs between C$25 and C$40, while premium Benjamin Moore topcoats often exceed C$100 per gallon. By sealing the wall first, you reduce topcoat consumption by approximately 30%. Our team adheres to industry standards for paint primers to ensure every project meets safety and performance benchmarks, providing a foundation that allows premium paints to perform as designed.
Solving the Porosity Puzzle
Drywall mud is incredibly thirsty. If you apply paint directly to unprimed mud, the drywall literally sucks the moisture out of the paint before it can level out properly. This rapid dehydration prevents the paint from forming a strong adhesive bond. In many cases, we see unprimed walls begin to peel or flake within 12 to 24 months of application. A dedicated pva primer creates a thin, plastic-like film that stops this suction, ensuring the paint dries at a controlled rate and stays bonded for decades. This technical step is how we deliver precision and care in every stroke, protecting your investment from the inside out.
Achieving a Flawless Finish in Kamloops
The unique light in the BC Interior can be unforgiving. During our bright Thompson-Okanagan summers, high-altitude sunlight hits interior walls at sharp angles, highlighting every minor texture difference between the drywall paper and the sanded joints. Proper priming ensures a consistent "tooth" across the entire surface, which is vital when you are exploring 2026 paint colour ideas that lean toward sophisticated satins and eggshells.
We recently consulted on a DIY project in Aberdeen where the homeowner skipped the primer. Despite using four coats of high-end paint, the seams were still visible under the afternoon sun. After we stripped the failing sections and applied a professional PVA base, the difference was night and day. The surface became a smooth canvas that allowed the pigment to truly pop. If you want to elevate your home without the stress of technical failures, consulting with a professional team can save you both time and material costs.
PVA Primer vs. Universal Primers: Making the Right Choice
Selecting the correct base layer determines whether your project looks like a DIY effort or a professional transformation. PVA primer is a specialized sealer designed specifically for the porous nature of fresh drywall. While universal primers are versatile, they serve a different functional role. For homeowners in Kamloops, the choice often boils down to cost and the specific condition of the substrate.
- Cost Efficiency: A standard gallon of PVA primer in the Canadian market typically ranges from C$25 to C$40. High-quality universal primers often exceed C$60 per gallon.
- Air Quality: Most PVA formulas are low-VOC and low-odour; they meet strict BC environmental standards for indoor air quality.
- Topcoat Compatibility: PVA works flawlessly with latex and acrylic paints. If you plan to use an alkyd (oil-based) topcoat, a universal primer is a safer bet for long-term adhesion.
PVA primer creates a thin, uniform seal that prevents the drywall from "drinking" your expensive topcoat. However, it lacks the "hide" or opacity found in universal options. If you're switching from a dark colour to a light one, a universal primer's pigment density will save you from applying multiple unnecessary finish coats. We use these distinctions to ensure every project receives the exact chemical bond it requires for a lasting finish.
When to Upgrade to a High-Build Primer
PVA primer is not a fix-all for damaged surfaces. If your walls have minor scuffs, sanding marks, or uneven texture from drywall repairs, a high-build primer is the better tool. These thicker formulas fill small imperfections that a thin sealer would simply mirror. You should also skip PVA if you're dealing with water stains or smoke damage. It lacks the chemical blocking agents required to stop stains from bleeding through. For complex projects involving older homes, finding the right residential painting near me ensures you have an expert who knows exactly when to swap a standard sealer for a heavy-duty stain blocker; to see how these professional standards are applied by experts in other regions, you can discover Esteem Painting and their approach to high-quality residential work.
The 2-in-1 Paint and Primer Myth
Retailers often market "self-priming" paints as a time-saving miracle. While these premium products work well on previously painted surfaces in good condition, they frequently fail on bare drywall. New drywall is incredibly thirsty. Without a dedicated pva primer base, the "paint and primer" product soaks into the paper and joint compound at different rates. This leads to a blotchy, uneven sheen known as flashing. Professionals reach for specialized products because they deliver predictable results. You'll know you need a separate base if the surface is dusty, porous, or has never seen a drop of paint. Investing in that dedicated layer, a practice followed by expert teams like Hudson Line Painters, ensures your final coat looks rich and professional.
How to Apply PVA Primer Like a Kamloops Professional
Achieving a flawless finish starts long before the first drop of paint hits the wall. Our team approaches every project with precision and care, beginning with a meticulous preparation phase. New drywall is incredibly thirsty and often covered in fine gypsum dust that prevents proper adhesion. You must remove every trace of dust using a vacuum with a brush attachment or a damp microfiber cloth. Skipping this step leads to peeling later on. In the semi-arid climate of the Kamloops area, where humidity levels often drop below 20 percent in the summer, surface preparation is even more critical to prevent the pva primer from drying too rapidly on a dirty substrate.
Choosing the right tools determines the texture of your final wall. For the standard drywall finishes found in many BC Interior homes, a 10mm nap roller sleeve provides a smooth, even coat. If you're working with a more aggressive texture like knockdown or orange peel, a 15mm nap ensures the primer reaches into every crevice. One of the most common mistakes DIYers make is over-rolling. Because PVA primer is thin, working it too much after it starts to set creates "holidays," which are thin or missed spots that will show through your topcoat. We recommend a single, confident pass to elevate the surface quality without disturbing the drying film.
Step-by-Step Application Guide
Professional results require a systematic workflow. Always start by cutting in the edges, corners, and around trim with a high-quality synthetic brush before moving to the main wall sections. This "wet-on-wet" technique prevents visible transition lines. When rolling the field, use a "W" pattern to distribute the liquid evenly across the surface. This method ensures you don't load too much product in one spot. To ensure the chemical bond works perfectly, maintain a room temperature between 20°C and 22°C during the application process. This temperature range is the sweet spot for the BC Interior, allowing the primer to level out before the moisture evaporates into our dry mountain air.
Post-Primer Inspection and Sanding
Once the primer is dry, which usually takes about 30 to 60 minutes in our climate, it's time for a critical inspection. You might notice "raised grain," where the water in the primer causes the paper fibers of the drywall to swell and feel like fine sandpaper. We use the "light pole" technique to find these imperfections. By holding a high-intensity work light parallel to the wall, we cast long shadows that reveal every bump or "holiday" in the coat. Taking the time for a quick scuff-sand with 220-grit paper after priming is the mark of expert painters in Kamloops who prioritize a premium result. This extra effort ensures the final topcoat looks like glass rather than orange peel.
Ready to transform your home with a professional touch? Contact BC Interior Painting Pros for a free estimate and see how we bring quality to every stroke.
Elevate Your Interior with BC Interior Painting Pros
Our philosophy of precision and care in every stroke begins long before the first coat of colour reaches your walls. It starts with selecting the perfect base, such as a high-quality pva primer, to ensure every new drywall surface is sealed correctly. With over 20 years of experience serving the Kamloops community, our team understands that a flawless finish depends on meticulous preparation. We don't take shortcuts. By choosing premium products for every project, we guarantee a result that looks professional and stands the test of time. This commitment to quality means we treat your home as if it were our own, focusing on the technical details that create a lasting impact.
We've spent two decades refining our process to ensure every client receives the best possible value. This starts with technical mastery of materials. Using a professional-grade pva primer isn't just a recommendation; it's a standard part of our quality control for new builds and renovations. It prevents the porous drywall from soaking up your expensive topcoat, which ensures the final colour is vibrant and uniform from day one. Our local expertise allows us to choose products that perform well in the specific climate of the BC Interior, providing you with a finish that resists peeling and fading.
Beyond the Primer: Our Comprehensive Interior Services
Successful interior painting in Kamloops requires more than just a bucket of paint and a brush. We integrate priming application into a holistic service model that covers every detail of your renovation. Our crew handles complex surfaces like kitchen cabinets and textured stucco with the same technical expertise we bring to standard walls. We specialize in the difficult tasks that DIY projects often struggle with, such as intricate sanding and surface repairs. We provide a no-surprises approach to every job. This means you receive a detailed estimate and a clear warranty before we even open a tin of paint. We're fully insured, giving you total peace of mind throughout the transformation of your living space. If you're interested in seeing how these professional standards are applied to diverse properties, you can check out Esteem Painting to explore their high-quality interior and exterior finishes.
Start Your Transformation Today
A professional eye for detail can turn a simple room refresh into a complete home revitalization. Our team brings decades of local knowledge to help you navigate colour choices and technical requirements specific to your property. Your home is your most significant investment, and protecting it requires more than just a quick fix. By hiring a local team that understands Kamloops building standards, you're investing in the longevity of your interior. We make the process simple and transparent. You can book a free estimate for your Kamloops home by contacting us directly. For those seeking additional inspiration from high-end international projects, check out Harbour and Hayes to see how professional finishing services can redefine a space. We're ready to bring your vision to life with the reliability and skill your property deserves. Let's elevate your living space together through expert craftsmanship and dedicated service.
Take the First Step Toward a Flawless Kamloops Interior
A stunning room transformation begins with the technical details that most people never see. Using a professional grade pva primer on new drywall is the only way to prevent uneven absorption and ensure a uniform, premium finish. This critical sealing step creates a smooth canvas that allows your chosen colors to truly shine. At BC Interior Painting Pros, we've spent over 20 years perfecting our craft right here in Kamloops, BC. Our fully insured and WCB-covered team handles every stage of the process with meticulous attention to detail, from initial prep to the final stroke. We're committed to delivering reliability and tangible value, ensuring your home looks spectacular for a lifetime. It's time to stop worrying about the complexities of drywall prep and start dreaming about your new look. We're ready to help you revitalize your environment with the precision your property deserves.
Request Your Free Interior Painting Estimate in Kamloops
Your journey toward a more beautiful, vibrant home starts with a single click.
Frequently Asked Questions
Can I use PVA primer on previously painted walls?
No, you shouldn't use PVA primer on walls that already have a layer of paint. This product is specifically engineered to seal porous surfaces like fresh drywall and joint compound. Applying it over a non-porous, painted surface prevents it from bonding correctly, which often leads to peeling. For existing paint, we recommend a high-quality acrylic primer to ensure a durable and professional finish.
How long does PVA primer take to dry in Kamloops?
In the semi-arid climate of Kamloops, PVA primer typically dries to the touch in 30 to 60 minutes. You can safely apply your first topcoat after 2 to 4 hours. While our local humidity levels often drop below 30% during the summer months, we always verify the surface is moisture-free. This precision ensures we elevate the quality and longevity of your home's interior environment.
Is one coat of PVA primer enough for new drywall?
One coat of pva primer is usually sufficient for most new drywall installations. The primary goal is to seal the paper and joint compound so they absorb paint at a uniform rate. This single layer creates an even foundation that prevents "flashing," where certain areas appear shinier than others. We apply this coat with meticulous care to ensure 100% coverage across every square foot.
Can PVA primer be used as a final coat?
No, you cannot use PVA primer as a final decorative coat. It lacks the necessary resins and pigments required for durability, scrub resistance, and UV protection. It's a foundational product meant to be covered by premium paint. Leaving it exposed results in a chalky surface that attracts dust and stains within 30 days, which compromises the integrity of your interior design.
Does PVA primer work on wood trim or just drywall?
PVA primer is formulated specifically for drywall and won't work on wood trim. Wood contains natural tannins that will bleed through this water-based sealer almost immediately. For trim, we utilize specialized bonding primers that provide the precision needed for a professional result. Using the wrong product on wood surfaces can lead to visible staining and adhesion failure in less than 90 days.
What happens if I don’t sand after using PVA primer?
If you don't sand after priming, your walls will likely have a rough, sandpaper-like texture. The primer often raises the tiny fibers on the drywall paper during the drying process. We use a 180-grit pole sander to meticulously smooth the surface before applying the first topcoat. This extra step is essential to achieve the flawless, professional finish our clients expect from a premium paint job.
Is PVA primer water-based or oil-based?
PVA primer is a water-based sealer made from polyvinyl acetate, which is the same resin found in carpenter's glue. This composition allows for easy cleanup with warm water and soap. It also meets Canadian VOC regulations, ensuring that your indoor air quality remains safe. Our team prioritizes these premium, low-odor products to provide a healthier environment for your family during the transformation.
Can I tint PVA primer to match my topcoat colour?
You can tint pva primer, but manufacturers generally limit this to light or pastel shades. Most professional standards recommend adding no more than 2 ounces of universal colorant per gallon to maintain the formula's integrity. Tinting helps achieve full opacity faster when you're using lighter colors. For deep, vibrant tones, we suggest using a dedicated high-hide primer to ensure the final color is rich and accurate.


